 It's been a while since I've had the opportunity to add another post to my Build a Better Blog Series, and that's mainly due to the complete overhaul my blog has been going through over the last several months. Today's post is of paramount importance to all bloggers out there in the active pursuit of making money through their site.
Now as you can see from my "Ways to Monetize Your Blog" section, I've tried most anything on the market aimed at monetizing my content, but honestly, haven't had a lot of luck yet. The one affiliate program that I've done well with though is through Amazon. Amazon is a great company to work with and earning commissions with them is quick and fairly easy, for they offer so many options to do so. If you're not already a part of the Amazon Affiliate plan, then I highly recommend you sign up.
 What I want to show you here is how to find and fix any broken Amazon affiliate links that are probably on your site. You might think that a plugin like "Broken Link Checker" will do that for you, but because Amazon is smart enough to never serve a true 404 broken link, this plugin won't work. But if you don't go back and fix these dead links, you're missing out on many years of potential money that could be earned in affiliate sales.
I've tried using a plugin called Azon Stock Checker which promises to hunt those broken affiliate links down for you, but found that this plugin does not work well at all and support is virtually nonexistent. That led me to discover this completely FREE method of finding those broken links yourself using the tools that Amazon already provides.
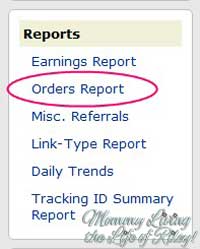 First, you'll need to log in to your Amazon affiliate account. I like to do this by clicking on the "Your Earnings Summary" in the dark gray bar at the very top of the Amazon page. Next, look on the left side of the screen in the column which lists your Reports and click on the option that says "Orders Report."
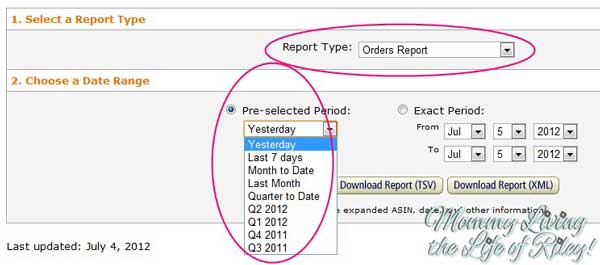
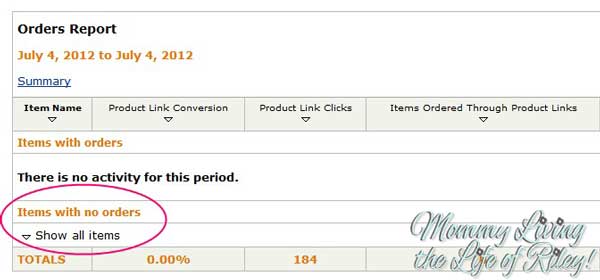
Once you're there, you'll notice that you can select a variety of date ranges, but Yesterday is automatically chosen for you. Pick whichever value you'd like to start with and then scroll down to the bottom of the first section entitled "Orders Report". Here you will see a row that says "Items With No Orders". At first, you may think that this information is virtually useless, but in actuality, this is how you will find your broken affiliate links.
When you click on the small arrow to the left of the words "Show All Items", every link that was clicked on by your readers who did NOT place an order will show up. This information is invaluable because at the very top of the list will be all of the broken links that your readers were wanting to find more information about on Amazon. These were all potential sales, but for one reason or another, the reader moved on without purchasing.
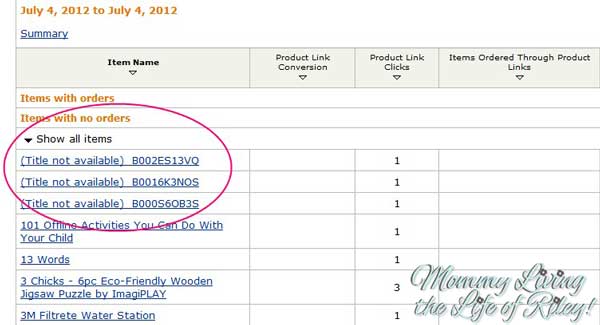
Once you have the list of ASIN numbers from Amazon, simply go back to your WordPress blog and search your entire list of posts for this particular number. (I'm sure the search feature will work on other blogging platforms, such as TypePad or Blogger, but since my site is a WordPress one, I only have experience with using this particular platform.) If you've never tried fixing broken Amazon affiliate links before, there will most definitely be a match of at least one or more posts featuring this ASIN product.
Open the post and search again (CTRL + F) for that particular ASIN number. This will direct you to each and every broken link within that post as well as tell you what product this used to link to. Now you can go back to Amazon, find a similar substitute and fix the link. You're back in business and your readers will be happy to find the product they wanted on the other end of your link instead of the dead Amazon page that was there before.
Since Amazon successfully keeps track of this data for an entire year, you can start by searching the orders report for last week, then expand to last month, last quarter, fourth quarter of last year, etc. Within a matter of 45-minutes, I had managed to fix every single broken Amazon link my readers clicked on for an entire year, quickly and easily!
If you really want to do your homework, you can also use the "Items With No Orders" information to help you reformat the posts which are consistently getting a high number of clicks without purchases. In order to find these highly clicked upon posts, click on the arrow under the column marked "Product Link Clicks". This will temporarily close the "Show All Items" list if you already had it opened, but when you click on the "Show All Items" list again, it will automatically be ordered by how many clicks each item received.
I had some posts here that were getting 8-10 no-order clicks on them in a short period of time and so I went back in to see what I could do better regarding my Amazon link placement. Without the ordered "Items With No Orders" list, I would have never noticed this opportunity to do things differently. I hope this little tutorial helps you in cleaning up your own broken Amazon affiliate links in a matter of minutes.
As always, if you have any questions, please feel free to leave a comment below and I will do my best to help.
I'm a former 7th grade Science teacher turned stay-at-home mom that lives in Houston, Texas. I am married to my college sweetheart and have a beautiful daughter named Riley, who definitely keeps me on my toes! I am also involved in starting a small business which would both manufacture and sell an invention that I've patented, called Toothpaste 2 Go. I love interacting with my readers and hope to learn as much about you as you learn about me!
Melissa @ Mommy Living the Life of Riley!
Add Melissa Cleaver to your LinkedIn Network
Add Mommy Living the Life of Riley to your Google+ circle |


